Summary:
In this part, we are going to deploy a new VM from a Windows server 2016 template, then install and configure the active directory, DNS, and DCHP services for this, our domain controller server. Also, we are going to create the user's infrastructure. This is going to be the most important VM of the infrastructure, this machine, is the one that will manage the whole VDI LAB, providing the rights and access to all the other virtual servers and, more importantly, to all the virtual desktops.
This is part 5 out of 12 of the VDI LAB series. Check out the introduction first.
The ultimate VDI deployment guide (from scratch) with VMware vSphere 6.5 and Horizon View 7.3 – 2018. 😉
1. Prerequisites
- Network and IP address range designed. This was done in part 1 of this series.
- Windows Server 2016 template, previously created in part 4 of this series.
2. Deploying the VM from a template
@VCSA
- Right-click on Windows Server template and select New VM from This Template...

- Name this domain controller VM, select ESXi host for the computer resources and leave the rest of the wizard as default.
- After the VM is created, change the hardware specs. CPU, RAM, and HDD. For my case, it looks like the image below.

- Power on the VM, the first thing to do is configure the IP address. I’ll use the IP configuration as the image below.

- Change also the computer name and reboot the VM
3. Install roles and features
@Domain Controller Server
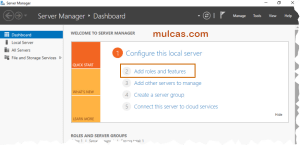
- From Server Manager go to Dashboard / Add roles and features

- Click Next to the first option of the installation wizard.

- Select Role-based or feature-based installation, click Next.

- Select the current server. It should be the only one available from the pool.

- Select:
- Active Directory Domain Service
- DHCP Server
- DNS Server

- Make sure .NET Framework 3.5 and 4.6 are selected. Also Group Policy Management.

- Click Next on the following steps.


- Review the installation and click Install

- The installation will start, wait until is completed and click Close.


DHCP service will be installed later, a warning message will show up.
3. Promote the server to a domain controller
- From Server Manager, click on the “flag” icon and then Promote this server to a domain controller.

- Select Add a new forest and choose a name to your domain. This is an important step, this domain name will be used for the whole infrastructure.

- Leave everything as default and type a DSRM password.

- Skip this step and click Next.

- Leave as default or change NetBIOS name.

- Select a location for AD database, or leave as default

- Review options

- Check prerequisites and click Install.

- The computer must be restarted.

- Login to the as the new domain configured.

4. Configure DHCP service
- From Server Manager, click on the “flag” icon and then Complete DHCP configuration

- Click Next to start DHCP configuration.

- Select credential and click Next. Use the same as Administrator computer.

- Close the wizard to finish the initial DHCP configuration.

- From Server Manager, go to Tools / DHCP

- Under DHCP, should be the server name, expand it to see IPv4 and IPv6.

- Right-click on IPv4 and select New Scope...

- Click Next to start the New Scope Wizard

- Provide a name and description for this scope.

- Add IP Address Range. Note that the network was previously configured in part 1 of this series. I’ll start my IP range leaving 20 IP addresses for the virtual infrastructure.

- Add Exclusions. I will exclude 80 IP address for ESXi host, Login VSI launchers and any other network element of the lab, so I want my DHCP range start from 10.0.0.100, which is the range for the golden images and the desktops.
NOTE: This could be done excluding all these IPs from step 10, but I prefer this option.

- Set Lease Duration. I am leaving 8 days as default.

- Confirm the configuration of the DHCP.

- Set and Add Router (default gateway) IP address.


- Set Domain Name and DNS Servers. I am using this server (Domain controller) and the Router IP address.

- Set WINS Servers if needed. This option won't be configured for this LAB.

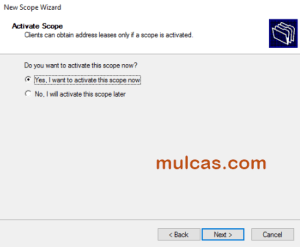
- Activate the scope.

- Click Finish to complete the scope configuration.

- From IPv4 / Scope / Address pool we can see that the pool is all set now.

- There is no need to do extra configuration for the DNS. We can go to Server Manager / DNS, Right-click on computer name and select DNS manager.

- From the computer name and domain name we can confirm that so far our only computer added to the DNS list is this one, the domain controller. All other servers and desktops will be added to this list.

5. Create OU and Add users
Let’s create users for vCenter, View Composer, events database and another one for this domain controller (those can be added later).
NOTE: If it is planned to use VCSA as vCenter and not Windows server based, this vCenter user is not necessary. For vSphere 6.7 this is the best option.
- First, add a new OU (Organization Unit) to “organize” all our infrastructure.

- I will call this OU “VM”.

- Add two more OU, Computer and Users. Add (drag and drop) the domain computer from Computer into the new Computer OU.

- From the User OU, right-click and select New / User

- Create vCenter user. Use the image below as an example.

- Create a password and check Password never expires

- Confirm user and password options and click Finish

- Follow the same steps to create other users, View Composer, and Events database. Domain user is optional for now.


