What
In this post, we are going to create a billing alert that triggers when your AWS account spends in total goes over a certain threshold each month, to estimate charges. More specifically, I don’t want any funny AWS charges, and I want to configure an alarm and set an alert that triggers when my AWS account spent over 15 USD each month. You can select your desired value, I think this 15 USD is suitable for what I expect to use, for now. Also, if you want to use this account to practice for any AWS certifications.
Using the AWS Free Tier
When you create an AWS account, you're automatically signed up for the AWS Free Tier for 12 months. Your AWS Free Tier eligibility expires at the end of the 12-month period. When your Free Tier expires, AWS starts charging the regular rates for any AWS services and resources that you're using. And even within the AWS Free Tier, you might get charged for some services and resources.
To avoid charges while on the AWS Free Tier, you must keep your usage below the AWS Free Tier limits. You are charged for any usage that exceeds the limits. To help you stay within the limits, you can track your AWS Free Tier usage and set a billing alarm to notify you if you start incurring charges. For more information, see AWS Free Tier limits and Tracking your AWS Free Tier usage. For tips about avoiding unexpected charges, see Avoiding unexpected charges. Contact AWS Support if you require additional explanation of unexpected charges on your bill.
How
There are two stages for this:
- Under Billing, Enable Receive Billing alerts
- Under CloudWatch, Create the desired alarm, in our case, Estimated Charges.
Billing Alerts
The first step is to enable billing alerts.
- Type and click Billing on the search box, or access to the link below (you must be signed in to your account).
https://console.aws.amazon.com/billing/home?#/
- This will bring you to the Billing & Cost Management Dashboard. As you can see, my dashboard is totally empty, I just created this account and I don’t have any feature or service enabled. Under Preferences, let’s click Billing Preferences.

- On the Billing preferences page, check the Receive Billing Alerts option. Then, Save preferences. After saving, go back to the AWS Console from the AWS icon.

CloudWatch
- From the AWS Management Console, let’s search for the CloudWatch service. Ther are two easy options to reach this service.
- First, in the text box, type CloudWatch, and click on it. This is the easiest way.
- Second, Expand All Services and search for CloudWatch. This is a good option to start getting familiar with all AWS services.
- If you decided to fo with the second option, expanding all the services, Search under the Management & Governance, and click CloudWatch.

- Under the CloudWatch dashboard, we now need to click on Billing. You will get the message below, indicating that you need to switch to the US East (N. Virginia) region. Unless you are already in this region.

- Go to your current region, next to your anime account, expand it, and select the US East (N. Virginia) region.
Image_05

Create an alarm
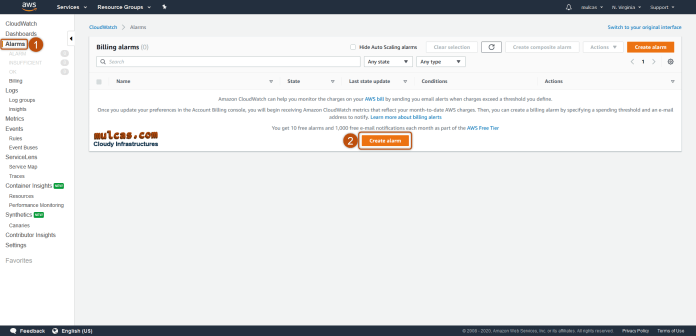
- After changing region, on the CloudWatch service, click on Alarms, you’ll be brought to the Billing alarms page. Here, click on Create alarm.

- Steps to create the alarm will be shown on the left fo this page. The first step is Specify metric and conditions. Here, click on Select metric.

- On the Metric area, under Metric name, type EstimateCharges. Leave other parameters as default.

- Scrolling down, under Conditions, select the conditions as the image below and define the threshold value as you desired, I am going to stick with 15 USD. Expand Additional configuration, and under Missing data treatment, select Treat missing data as ignore (maintain the alarm state). This option will prevent getting notifications all the time (every six hours, the default time).

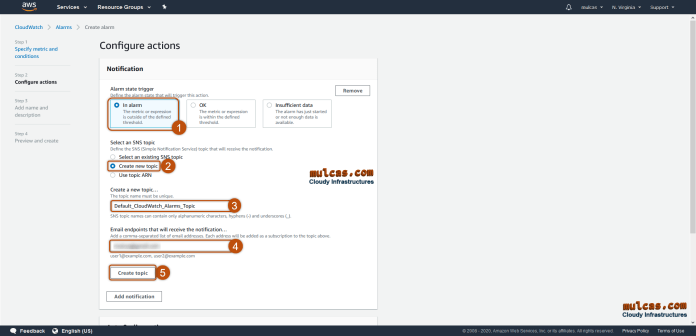
- The second step is Configure actions. On the Notification area, select In alarm, under Alarm state trigger. Next, we need to create a new SNS (Simple Notification Service) topic. Or select one that you have previously created. Name the topic, type an email to receive notifications, and click on Create topic.

- Under the areas below, Auto Scaling action and EC2 action, leave everything by default. Click Next.

- The third step is Add name and description. Here simply add a name for this alarm and an optional alarm description. Click Next.

- The final step is Preview and create. Review all the previous steps: metrics, conditions, actions, and naming. Finally, at the end of this page click on Create alarm.

The alarm is created
- The alarm will be created under the Billing alarm page.

- From the created alarm, notice that under the Actions column you’ll see a Pending confirmation message. This is a call to action to confirm our email for the SNS. After you confirm the SNS email, you’ll get Subscription confirmed notification, similar to the one below.

- You can click on the alarm to open the specific alarm page. Here you will see a chart for the select metric and the alarm details. Initially, the alarm will be categorized in Insufficient, as it is new and we don’t have sufficient data to collect. Later on, the alarm will be moved to the OK category.

- After creating the alarm, you’ll have some options for it. From the Action button on the top-right corner of the alarm page you can; Edit, Delete, Copy, or Add to dashboard.
In conclusion, this alarm will trigger when your account billing exceeds the threshold you specify. It triggers only when actual billing exceeds the threshold. It doesn't use projections based on your usage so far in the month.
Resources:
Creating a Billing Alarm to Monitor Your Estimated AWS Charges


